Showing posts with label Voyager jacket. Show all posts

May 19, 2015

Tutorial, part 13 - Lining to Body

Fold the hem facings downward at the jacket body's center front.

Pin the jacket lining assembly to the jacket body assembly along the center front and neckline, right sides together, then sew the lining assembly to the body assembly, using division-color thread for the yoke and black for the jacket body.


Clip away the upper corners of the front opening, and clip the neckline seam allowances as needed for it to turn well. 

Turn the jacket's right side out (so the lining is on the inside) and press the center front and neckline edges. 

Carefully pin the jacket body to the lining at the yoke/body and yoke facing/lining seam lines, matching the two exactly, then "stitch in the ditch" through all layers with black thread as far as possible to secure the lining assembly. (We recommend stitching up to about 2" from the armscye, if you're able.)


You may also wish to "stitch in the ditch" in the same manner along the centermost 1-2" of the shoulder seam using division-color thread (just stop before you get to your shoulder pad!), as well as your jacket's back.


Fold the jacket's hem facings upward again. 


Stretch your jacket's side panels back to their original shape, pulling the elastic as needed for the jacket to lie flat. 

Using a zipper/piping foot and black thread, secure the upper edge of the side waistband facing to the jacket by stitching through all layers from the center back/side back seam line to the center front/side front seam line, using the upper edge of the elastic as a guide. (This should be ⅜" from the top of the waistband.) 


Once finished, your jacket sides should look something like this: 


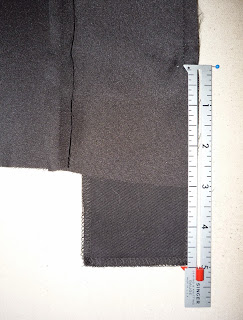
Turn the hem facings upward (including the bottom portion of the front facing) and press.


Hand-sew the top of the center front and center back hem facings to the underlining. 


Fold the front facing back to the underside. 

Hand sew the front facing to the hem facing at the bottom of the jacket where the two overlap.


OPTIONAL: If you were unable or did not wish to serge the facing edge for some reason, or if you wish to further prevent fabric unraveling, apply liquid fray preventer to the edge you just sewed.

OPTIONAL: To further prevent your front facings from flapping about, hand sew the facing/lining seam allowances to the underlining.


Pull up the bottom of the lining so the its raw edge and seam line are flush with those of the hem facing. 

Slip stitch the lining assembly bottom to the jacket bottom, matching seam lines and leaving the centermost edges free for the time being.


TIP: It's extremely helpful to have somebody else stretch out the jacket sides temporarily while you vertically pin the lining into place every half inch or so, then, while hand sewing, bend the jacket over a finger or two to sufficiently stretch it. It can be pretty annoying and/or time-consuming, which might be part of why this jacket was so seldom seen on-screen ... 

I hate this!


Press the excess lining downward, forming a jump pleat. 

Slip stitch the front edge of the lining to the front facing along the lower edge and press. 


Lastly, hand sew the sleeve lining to the sleeve, matching raw edges, and press the excess sleeve lining downward. 


CONGRATULATIONS! 

YOU'RE FINISHED!


If you found this tutorial helpful, please support my costume research on Ko-Fi! :)


Tutorial, part 12 - Elastic

Cut an appropriate length of 2" elastic, plus about ¾" in addition to whatever amount you require for a comfortable elasticized fit. 

(And you do know how much you need because you made a muslin test or three first, right???) 

I (Alex), for instance, need about 8" of elastic on each side for a comfortable fit, so I cut an 8 ¾" length of elastic. 

Place your elastic so its lower edge is flush with the body/facing seam line, and it overhangs the side front/center front (or side back/center back) seam line by about ⅜". 

Fasten the elastic to the jumpsuit body securely by vertically stitching exactly over the body panel seam line. (Since you can't actually see it, just give it your best guess. It'll probably be fine.)


Repeat for the other end of the elastic.

This will cause the side of your jacket to pull, but don't worry; that's the whole point! We'll finish the side waistbands in the next step.

Repeat for the other side.


PREVIOUS: Tutorial, part 11 - Hem Facings

NEXT: Tutorial, part 13 - Lining to Body

Tutorial, part 11 - Hem Facings

Sew the center front hem facing (piece J) to the side waistband facing (piece K). 

Sew that assembly to the center back facing (piece L). 

Repeat for the other side, then sew the two assemblies together along the center back. 

Press all seam allowances open.


Sew the facing assembly to the jacket body, right sides facing and matching seam lines.


Fold the facing assembly upward and press. 

Understitch the seam allowance to the facing assembly ⅛" from the bottom of the jacket.

Tutorial, part 10 - Yoke Facings to Lining

Sew the back yoke facing to the back lining assembly, right sides together, with ¾" seam allowance. 

Trim the seam allowances to ⅜" and press open.


Pin the front facing (piece I) to the centermost front lining assembly, with upper side/open edges flush and right sides together. The front facing will overhang the bottom of the center front lining by 2". 

Beginning at the top, sew the front facing to the front lining assembly, stopping 3" from the bottom of the lining. 

Press the seam allowances toward the lining, including the bottom (un-sewn) centermost edge of lining.


Sew the front yoke facing to the front lining assembly, right sides together, with ¾" seam allowance. 

Trim the seam allowances to ⅜" and press open.


Sew the front lining assembly to the back lining assembly at the shoulder seam and press seam allowances open. 

Repeat for the other side. 

Sew the sleeve lining (piece Q) to the lining assembly, matching edges and notches. 

Repeat for the other side. 

Close the lining assembly sides and sleeves in one continuous stitch, as done previously with the jacket body, and press seam allowances open. 

Press the bottom of the sleeve linings upward ⅜" toward the wrong side.


Press the bottom of the lining body assembly upward ⅜" toward the wrong side as well.


Your jacket's lining assembly should now look like this:

Tutorial, part 9 - Lining Assembly

Sew the center front lining (piece N) to the side front lining (piece D). 

Press seam allowance open. 

Repeat for the other side. 


OPTIONAL: add pockets in a style of your choice. On the pattern, we have included recommended pocket placements for ½" by 5" welt or double-welt pockets. 

Depending on your physique, you may wish to move the pocket placements, and those with larger hands may wish to widen the pocket opening, but these should at least be a good place to start. The pocket should begin immediately below the breast, and the pocket pouch should not extend into the hem facings. 

We recommend using the shell fabric (black wool gabardine or black cotton twill) for the welts, and any fabric should do nicely for the pocket pouches; we like to use the black lining fabric, but white muslin would work well, too.


Sew center back lining (piece P) to the side back lining (piece O). Press seam allowance open. 

Sew the two back assemblies together along the center back. Press seam allowance open.


TIP: Rather than pressing the lining seam allowances open, you may instead wish to serge them together. 

TIP: The lining panels have our standard ⅜" seam allowance, but you may wish to taper them to ¼" an inch or two from the beginnings and ends of the seam lines to give the lining body some additional fullness and avoid any pulling/contorting/etc. of the garment body once the two are "married" later.


NOTE: As the VOY jackets were always worn open, the action pleats were, for all intents and purposes, entirely cosmetic, rather than functional - that is, the jacket was just supposed to look like the upper portion of the jumpsuit, and the action pleats didn't need to actually "work." 

However, we have designed our VOY jacket pattern so that the action pleats are, as Data would say, "fully functional." 

The spandex panel serves the same purpose it did on the jumpsuit: to allow the action pleats to open as needed then pull them back into place, but we have also accommodated for the pleats in the lining assembly via three pleats in the lining back: a 1" pleat at the center back and two ½" pleats along the side back seams. 


To form the side back pleat, stitch downward about 2" from the top of the lining assembly again ½" from the center back/side back seam line, reinforcing the stitch line at the bottom. 

Stitch upward 1" from the bottom of the lining assembly in the same manner.


Open the lining assembly and press the ½" pleat into place. 

Repeat for the other side.


To form the center back pleat, stitch downward about 2" from the top of the lining assembly again 1" from the center back seam line, reinforcing the stitch line at the bottom. 

Stitch upward 1" from the bottom of the lining assembly in the same manner.


Open the lining assembly and press the 1" pleat into place. 

Tutorial, part 8 - Shoulder Pads

The necessary loft of the shoulder pads will depend on the wearer's physique (as will the precise angle of the shoulder seam, for that matter); most non-raglan shoulder pads will work nicely, though, like these:


Place the shoulder pad inside the jacket so that the pad's long edge is flush with the jacket's armscye seam, and the pad's seam (if it has one) is flush with the jacket's shoulder seam. 

Hand-stitch the pad securely in place to the yoke seam allowances, being careful not to stitch all the way through to the outside of the garment. 

Repeat for the other side. 


TIP: We recommend securing the shoulder pad to the jacket in only two places: the centermost and outermost portions of the shoulder pad along the shoulder seam. This will mimic the effect of the snaps used on the screen-used jumpsuits and prevent any unsightly puckering along the armscye caused by slightly misplaced or poorly sewn pads.


PREVIOUS: Tutorial, part 7 - Close Sides

NEXT: Tutorial, part 9 - Lining Assembly

Tutorial, part 7 - Close Sides

Sew the jacket sides closed in one continuous stitch, from the bottom of the jacket body to the bottom of the sleeve, matching edges and seam lines, right sides together.


Press seam allowances open. 

Repeat for the other side. 


Fold the sleeve hem allowance upward (the "default" hem allowance on the pattern is 2"), press, and hand sew the seam allowance to the sleeve. 

Repeat for the other side.

Tutorial, part 6 - Sleeves to Body

Pin the sleeve assembly to the body, matching shoulder point/sleeve and yoke/body seam lines and appropriately placing the shoulder seam. 

Sew the sleeve to the body, using division-color thread for the shoulder point and black for the sleeve. 

Press the armscye seam allowances open using a tailor's ham.


It's at this point you'll be glad you clipped out the yoke/body seam allowances in the key areas to reduce bulk!


The top of the action pleat should meet the yoke exactly at the armscye edge of the yoke/body seam line.

Tutorial, part 5 - Shoulder Point onto Sleeve

Stay-stitch the lower corner at the top of the sleeve (piece H), where the shoulder point will be attached, ⅜" from the edges, and clip the sleeve vertically from the corner to the stay-stitch's pivot point.


Sew the shoulder point (piece G) to the sleeve, right sides facing. 


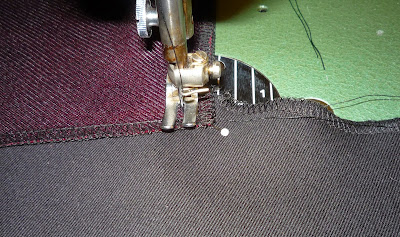
TIP: With the shoulder point on top, stitch to the pivot line (you can mark this with chalk, a disappearing ink fabric marker, or even a pin), and stop with the needle still in the fabric. Lift the presser foot and rotate the sleeve so that the other sleeve edge is flush with the other edge of the shoulder point, lower the presser foot, and continue stitching.


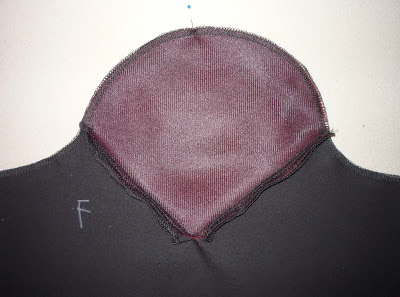
Once you've sewn the shoulder point onto the sleeve, it may initially look something like this:


And you'll feel like this:


But don't worry! A sleeve even this "bad" can be salvaged with very little effort, and we'll show you how.


Turn the sleeve over so the wrong side faces upward. 


Notch the shoulder point seam allowances at the bottom corner. 


Steam and press the area directly beneath the corner of the shoulder point. 

If steam doesn't get the job done, you may want to lightly spray a bit of water on the area and press it again. 

See how much better it already looks? 


Press the shoulder point/sleeve seam allowances open.


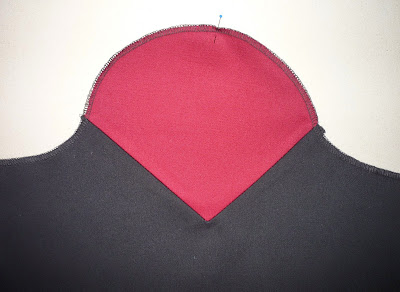
At this point, the sleeve should be looking way, way better: 


As a finishing touch, we recommend interfacing the area directly beneath the bottom corner of the shoulder point to keep it looking nice, flat, and crisp. 

Cut a small, rectangular piece of lightweight or midweight fusible interfacing (about 2" x 1" or so). 

We recommend cutting it with pinking shears ("pinking" it), thus minimizing the effect of strong, linear imprints on the right side of the garment where the edges of the interfacing are, better obscuring them. 

Make sure the fabric area beneath the shoulder point is wrinkle-free, then fuse the interfacing strip to the wrong side of the sleeve. We recommend placing one of the pinked wedges directly beneath the bottom corner of the shoulder point, as high as possible.


This interfacing is a subtle touch, and, theoretically, if you've done a good job with the sleeve thus far, you might not even "need" it; here is a picture of the same sleeve before and after the interfacing was applied.

Without interfacing
Interfaced


As you can see, the difference is subtle - especially when the finished garment is worn and moving - but it is a genuine improvement and helps keep it looking nice by preventing future wrinkling beneath the shoulder point. 

Repeat for the other shoulder point/sleeve.


Here's a sleeve comparison before and after notching the shoulder point seam allowances, thoroughly steaming and pressing the area beneath the shoulder point, pressing the shoulder point/sleeve seam allowances open, and fusing pinked interfacing beneath the shoulder point.

Tutorial, part 4 - Front to Back

Sew the front assembly to the back assembly at the shoulder.

Press the shoulder seam open, ideally using a seam roll to avoid making impressions of the seam allowances on the right side of the yoke.

Tutorial, part 3 - Yoke to Body

Sew the front yoke (piece A) to the front body assembly, right sides together, with ¾" seam allowance.


Press seam allowances open. 

We recommend reducing bulk by clipping out as much of the seam allowances as possible to about ½" from each of the outer ends of the seam line (center front and armscye).


Repeat for the other side.


Sew the back yoke (piece B) to the back body assembly, right sides together, with ¾" seam allowance. 

Press the seam allowances upward (toward the yoke).


We recommend reducing bulk by cutting away the yoke/body seam allowances at the armscyes in the same manner as done previously on the front.


Note that, from the right side, the top edges of the action pleats should be ⅜" from the edges of the armscyes: